Sometimes you have the need to quickly spin up an Oracle Apex install to test something out or to just have a “clean” instance. Luckily this is quite easily done with Docker.
You just need three things :
- Container image for an Oracle database
https://github.com/oracle/docker-images - Oracle Apex
https://www.oracle.com/tools/downloads/apex-downloads.html - Oracle REST Data Services
https://www.oracle.com/database/sqldeveloper/technologies/db-actions/download/
First we need to make sure we have created a container image for an Oracle database which we can refer to. In this post I’m using a 19c database created with the tools found at the github page for the docker-images.
Download the lastest versions of Oracle Apex and the Oracle REST Data Services (ORDS). At the time of writing this post I have been using Apex 22.1 and ORDS 21.2.0.r1741826.
Note: Starting with ORDS 22 Oracle changed the silent installation, the installation provided here does not work with ORDS 22. For more info see: Quickstart Apex with docker-compose v2
All the steps below which create files and folders are included in the zipfile attached to this post. I’ve been using docker on a Linux host
We need to create a folder tree. I’ve been using /opt/DockerData/Oracle/containers/19cApex22 as the “root” of the tree, but you’re free to choose whatever you like. You only need to keep in mind you need to change the paths in the different files.
We’re going to create the following tree:
root
 +--\
 |   oradata
 +--\
 |   stage
 +--\
 |   buildOrds
 +--\
 |  scripts
oradata will contain the database files of the 19c Database, stage the installation of Apex and buildOrds amount other files the zip file containing the latest ORDS release and scripts an installation helper script.
Step 1: Download installations
Place the downloaded APEX release zipfile in the folder stage and extract it with unzip. You’ll end up with two new folders (and lot of files): apex + META-INF
After extracting change the rights on the apex folder to make it a temp folder writable by everyone (else you’ll end up not being able to create files in it from the database container as it runs under “oracle”)
chmod 777 apex
chmod +t apex
Place the downloaded ORDS release zipfile in the buildOrds folder. Make sure it is named ords-latest.zip (default when you’ve downloaded the latest version).
Step 2: create an ORDS config file
First we need to create a config file which will be used by ORDS. Below is the config file I use.
db.hostname=ApexDB
db.port=1521
db.servicename=orclpdb1
#db.sid=
db.username=APEX_PUBLIC_USER
db.password=Oracle#01
migrate.apex.rest=false
rest.services.apex.add=false
rest.services.ords.add=true
schema.tablespace.default=APEX
schema.tablespace.temp=TEMP
standalone.http.port=8080
standalone.mode=false
standalone.static.images=/opt/images
user.tablespace.default=APEX
user.tablespace.temp=TEMP

user.public.password=Oracle#01
user.apex.listener.password=Oracle#01
user.apex.restpublic.password=Oracle#01

sys.user=sys
sys.password=Oracle#01

plsql.gateway.add=true

feature.sdw=true
restEnabledSql.active=true
Note the file contains passwords, so if you want to change them you have to change them here and in the apex installation starter sql script.
Note2: It doesn’t use very secure passwords (everything is set to Oracle#01), so don’t use it for a production environment.
Step 3: Create the Dockerfile to build the ords image
Create the Dockerfile for creating the ords image. Create a file named “Dockerfile” (or download the zipfile attached to this post). You need to end up with a file like below.
FROM tomcat:9.0

RUN mkdir -p /opt/ords
COPY ords-latest.zip /opt/

RUN unzip /opt/ords-latest.zip -d /opt/ords
RUN mkdir -p /opt/ords/conf
COPY ords_params.properties /opt/ords/params/
RUN cd /opt/ords/ && java -jar ords.war configdir /opt/ords/conf
COPY first_run.sh /
RUN chmod +x /first_run.sh

CMD /first_run.sh
The DockerFile will create an ords image based on Tomcat. It will copy the downloaded zip with the latest version and extract it. Copy the config file we’ve created and copies the “first_run.sh” script, which tries to start ORDS and installs it when it’s the first run of the container.
Step 4: Create the first_run.sh script
We need a script which installs / starts the ORDS service. Below is the script
#!/bin/bash
#
# Checks if this is the first run
#

if [ -e /usr/local/tomcat/webapps/ords.war ]; then
  catalina.sh run
else
  echo "First run, setting up the system..."
  echo "First wait a bit for Oracle to stabilize...."
  sleep 60
  cd /opt/ords
  java -jar ords.war && touch /usr/local/tomcat/webapps/i/INSTALLED
  cp ords.war /usr/local/tomcat/webapps
  catalina.sh run
fi
The script will try to determine if the war file has been installed in the active container. If it is not it assumes it’s the first run of everything and tries to give the oracle container a bit of time to “do it’s thing”.
It will then install the ords.war file and launch Tomcat.
Step 5: Create the docker-compose.yml file
Next we need to create a docker-compose file which stitches the two containers, the database and the ORDS, together. Below the contents of the docker-compose.yml file.
version: '2'

services:
        ApexDB:
                image: oracledb:19c
                container_name: 19cdb
                cpu_count: 2
                restart: always
                volumes:
                        - /opt/DockerData/Oracle/containers/19cApex22/oradata:/opt/oracle/oradata
                        - /opt/DockerData/Oracle/containers/19cApex22/stage:/opt/stage
                        - /opt/DockerData/Oracle/containers/19cApex22/scripts:/opt/scripts
        TomcatORDS:
                image: ords
                build: buildOrds
                depends_on:
                        - ApexDB
                container_name: ords
                restart: always
                volumes:
                        - /opt/DockerData/Oracle/containers/19cApex22/stage/apex/images:/usr/local/tomcat/webapps/i
                ports:
                        - 8080:8080
                links:
                        - ApexDB
Step 6: Make sure the scripts are there
Download the attached zipfile and extract the scripts which go in the “Scripts” folder from it or just use the tree created by it.
Step 7: Launch the containers
Start the containers via “docker-compose up -d” and then follow the progress with a “docker-compose logs -f”. Depending on the speed of your docker host and disks the first start-up will take some time. The database container will detect there is no database yet, so it will create it. The magic lines (excerpt) you need to be waiting for are:
19cdb2        | The Oracle base remains unchanged with value /opt/oracle
19cdb2        | #########################
19cdb2        | DATABASE IS READY TO USE!
19cdb2        | #########################
19cdb2        | The following output is now a tail of the
The database has now been created so we can install Apex in it.
Step 8: Perform installation of Oracle Apex
We need to connect to the database container to install Apex in it. The installation script in “scripts” comes in handy with this. The scripts folder is mounted within the database container.
Use docker container list to determine the hash of the database container and then connect to it via: docker exec -it <hash> bash
Then switch the the folder /opt/scripts and launch the “install_apex.sh” script. (. install_apex.sh)
It will change the passwords in the database, create a tablespace in the pluggable database and start the installation of apex. It will also create an “admin” user for the Apex installation. All passwords are set to “Oracle#01”
There are two passwords you need to enter manually (just type in Oracle#01 when requested), the one for the apex_listener user and the one for the apex_rest_public_user. The installation steps out to the os for catching the value for the passwords, so therefore the script isn’t able to specify them.
You will see the following prompts to enter the password:
Enter a password for the APEX_LISTENER user              []
Enter a password for the APEX_REST_PUBLIC_USER user              []
When you’ve never run ords against the database (which you haven’t because it’s a new install) the last command of the installation will fail, but it can safely ignored:
ERROR at line 1:
ORA-01918: user 'ORDS_PUBLIC_USER' does not exist
Step 9: Reboot the containers
We need to bring the containers down and have docker-compose recreate them. This will trigger the first-run within the ords container. The Oracle datafiles are persistent, so the database within the database container won’t start recreating itself.
At the docker host give the command docker-compose down && docker-compose up -d && docker-compose logs -f
The above command will bring everything down, if that process succeeds without error it brings everything up again. The last part is to show a tailing log so you can follow the “boot” process.
If everything goes as planned the first output you will see will be similiar to the example below
ords2         | First run, setting up the system...
ords2         | First wait a bit for Oracle to stabilize....
19cdb2        | Connected to an idle instance.
19cdb2        |
19cdb2        | SQL> ORACLE instance started.
19cdb2        |
19cdb2        | Total System Global Area 1610609928 bytes
19cdb2        | Fixed Size		    9135368 bytes
19cdb2        | Variable Size		  402653184 bytes
19cdb2        | Database Buffers	 1191182336 bytes
19cdb2        | Redo Buffers		    7639040 bytes
19cdb2        | Database mounted.
19cdb2        | Database opened.
19cdb2        | SQL> Disconnected from Oracle Database 19c Enterprise Edition Release 19.0.0.0.0 - Production
19cdb2        | Version 19.3.0.0.0
19cdb2        | The Oracle base remains unchanged with value /opt/oracle
19cdb2        | #########################
19cdb2        | DATABASE IS READY TO USE!
19cdb2        | #########################
19cdb2        | The following output is now a tail of the alert.log:
19cdb2        | 29170717,29173618,29181568,29182920,29183298,29186091,29191827,29201143,
19cdb2        | 29201695,29209545,29210577,29210610,29210624,29210683,29213641,29219627,
19cdb2        | 29224294,29225861,29229839,29235934,29242906,29243749,29244495,29244766,
19cdb2        | 29244968,29248723,29249583,29251564,29255616,29260224,29261695,29271019,
19cdb2        | 29273360,29282090,29282666,29285453,29285621,29290235,29292232,29293806,
19cdb2        | 29294753,29299830,29307090,29307109,29311336,29329675,29330791,29339299,
19cdb2        | 29357821,29360467,29360775,29367971,29368725,29379299,29379381,29380527,
19cdb2        | 29381000,29382296,29391301,29393649,29402110,29411931,29413360,29457319,
19cdb2        | 29465047
19cdb2        | ===========================================================
After a minute the ords container will continue it’s startup and tries to install the ORDS service you will see something like below:
ords2         | Requires to login with administrator privileges to verify Oracle REST Data Services schema.
ords2         |
ords2         | Connecting to database user: SYS AS SYSDBA url: jdbc:oracle:thin:@//ApexDB:1521/orclpdb1
ords2         |
ords2         | Retrieving information.
ords2         | 2022-07-15T11:33:04.043Z INFO        reloaded pools: []
ords2         | 2022-07-15T11:33:04.094Z INFO        Installing Oracle REST Data Services version 21.2.0.r1741826
ords2         | 2022-07-15T11:33:04.140Z INFO        ... Log file written to /root/ords_install_core_2022-07-15_113304_00139.log
ords2         | Warning: Nashorn engine is planned to be removed from a future JDK release
ords2         | 2022-07-15T11:33:05.383Z INFO        ... Verified database prerequisites
ords2         | 2022-07-15T11:33:05.585Z INFO        ... Created Oracle REST Data Services proxy user
ords2         | 2022-07-15T11:33:05.843Z INFO        ... Created Oracle REST Data Services schema
ords2         | 2022-07-15T11:33:06.320Z INFO        ... Granted privileges to Oracle REST Data Services
ords2         | 2022-07-15T11:33:07.971Z INFO        ... Created Oracle REST Data Services database objects
19cdb2        | 2022-07-15T11:33:09.168083+00:00
19cdb2        | ORCLPDB1(3):Resize operation completed for file# 9, old size 399360K, new size 409600K
ords2         | 2022-07-15T11:33:12.236Z INFO        ... Log file written to /root/ords_install_datamodel_2022-07-15_113312_00236.log
ords2         | 2022-07-15T11:33:12.865Z INFO        ... Log file written to /root/ords_install_apex_2022-07-15_113312_00865.log
ords2         | 2022-07-15T11:33:13.587Z INFO        Completed installation for Oracle REST Data Services version 21.2.0.r1741826. Elapsed time: 00:00:09.475
When everything has gone OK you will end up with something like:
ords2         | 2022-07-15T11:33:19.406Z INFO        Deployment of web application archive [/usr/local/tomcat/webapps/ords.war] has finished in [5,068] ms
ords2         | 2022-07-15T11:33:19.406Z INFO        Deploying web application directory [/usr/local/tomcat/webapps/i]
ords2         | 2022-07-15T11:33:19.426Z INFO        Deployment of web application directory [/usr/local/tomcat/webapps/i] has finished in [20] ms
ords2         | 2022-07-15T11:33:19.428Z INFO        Starting ProtocolHandler ["http-nio-8080"]
ords2         | 2022-07-15T11:33:19.452Z INFO        Server startup in [5172] milliseconds
It’s now time to connect to the apex instance. It will be listening at port 8080 (specified in the docker-compose.yml). So let’s go to http://dockerhost:8080/ords/ to try it out. You should end up at the login screen.
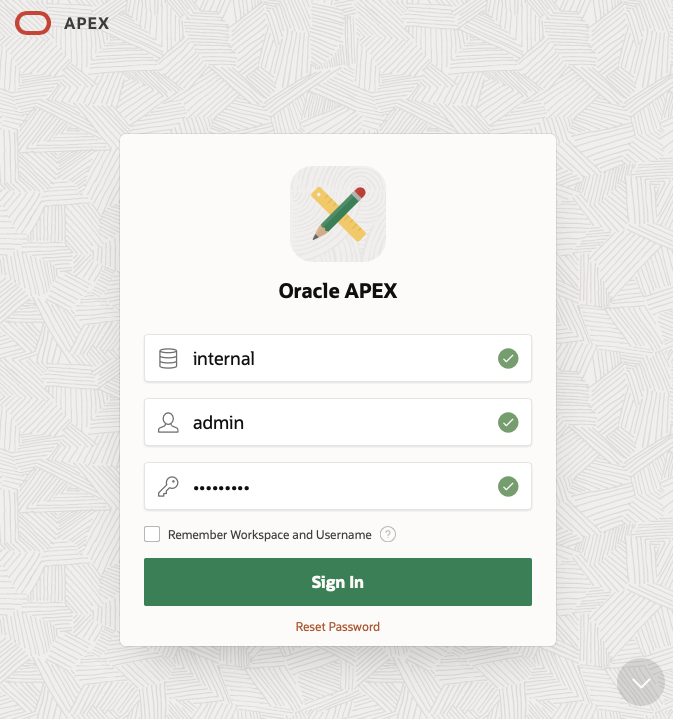
As we have just installed Apex we have only one workspace, the internal one. Log-in as admin (password Oracle#01).
The first thing you’re asked is to change the password. After that’s done Apex welcomes you and suggests you create a new workspace.
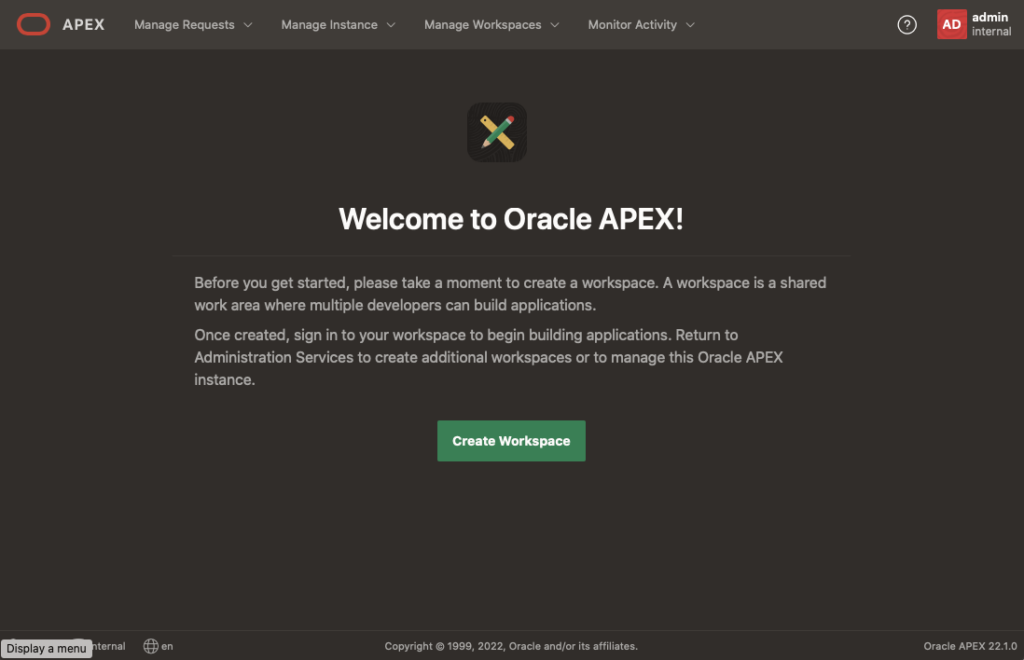
Your instance is now ready to use